| Author |
 Topic Topic  |
|
viper_biker
Administrator

Ireland
7563 Posts |
 Posted - 28/11/2006 : 01:21:35 Posted - 28/11/2006 : 01:21:35


|
DISCLAIMER : Any of the words written or actions taken in the following post are not endorsed by 400Greybike and are the personal writings of myself. If you undertake any of the following processes you are responsible for your own actions, neither 400GB or myself will assume any responsibility. If you are not happy to undertake any of these actions please have a professional perform this task. Thanks you.
PLEASE DO NOT ATTEMPT THIS AT THE MINUTE AS IT IS NOT COMPLETED, THIS IS JUST THE START AND WILL BE FINISHED BY THE END OF THE WEEK, THANK YOU.
OK, so, as requested I have started on my write-up on how to check the shims, or valve clearences on the NC30. First of all, let me say, it is not hard and is definately nothing to be afraid to do. This will also save you a few �100 now that you won't have to go to a mechanic to get it done. Before I start I want to put my thanks out there first before I forget. Thanks Rhory (castroljc) and Stu (Bunter) for having a laugh last night when we had our first attempt on one of Rhory's many NC engines but it all worked out fine, and also a big thanks to Rick Oliver for supplying the guide on how to do it.
Firstly this is what you'll need,
- Ratchet with a 10mm, 14mm and 17mm socket,
- Feeler gauge that can measure between 0.12mm-0.18mm and 0.21mm-0.27mm
- And possibly a flat headed screwdriver to carefully help you separate the cylinder head from the block.
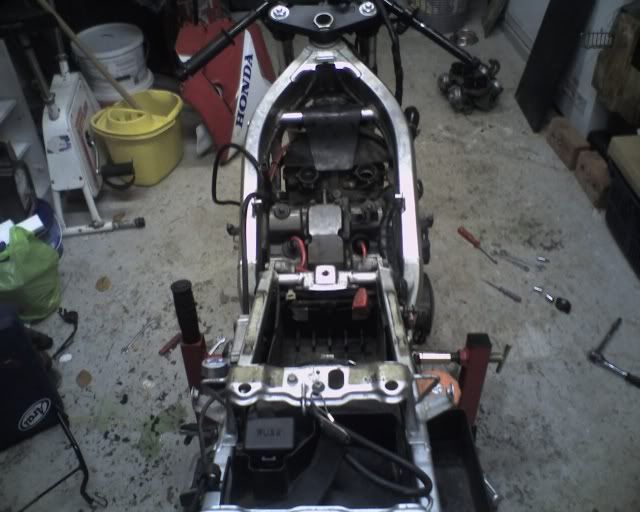
OK, so you will need to strip pretty much all of the bike (this is where the dealer gets you in labour costs). So,
- Bodywork off
- Tank, airbox, carbs out
- Top radiator off (or dropped to allow you access to the front head)
(If you don't know how to do any of the above please consult the Haynes manual)
Your bike should now look like this (pic is from an '89 NC30 I re-built last year  ) )
Now for the fun stuff. First of all remove the 4 bolts that holds the head in place. They are 10mm hex head screws,
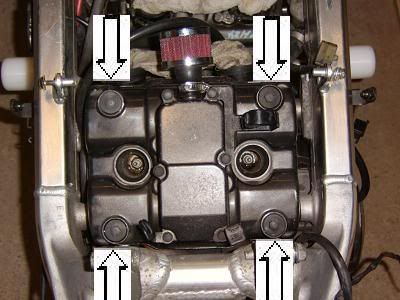
Once removed carefully use a flat head screw driver to prise off the cam cover. Once off it will now look like this,
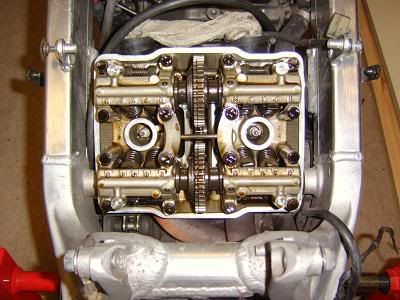
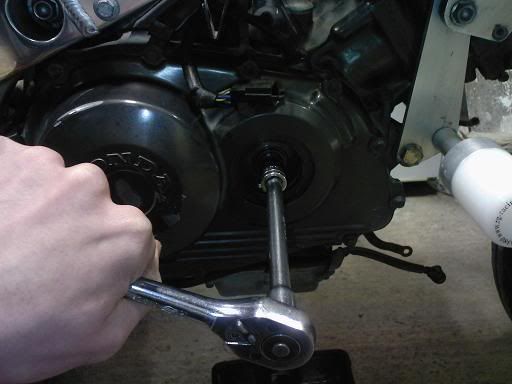
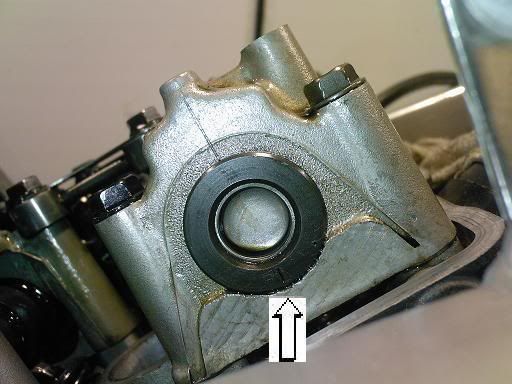
Looks scary don't it. Don't be scared, if you're lucky you'll not need to replace any of the shims. Next up is to remove the Timing Hole Cap. A 17mm socket will sort that out to allow you access to the Timing nut adjuster thingy (a very technical term, 'I will not buy this record, it is scratched' )
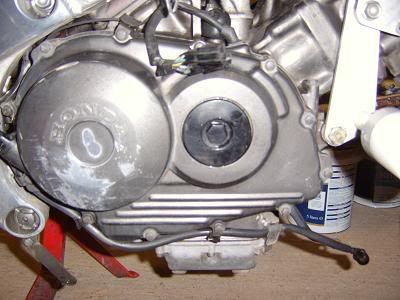
Next up you'll need the 14mm socket to turn the engine over.
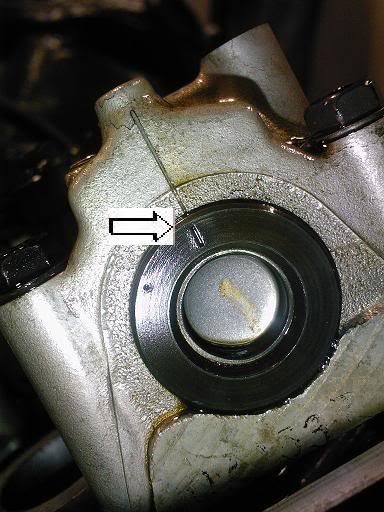
Turn until you get both of these marks lined up. T1 and the mark on the casing, and the other 2 lines to match on the top of the cam shaft.
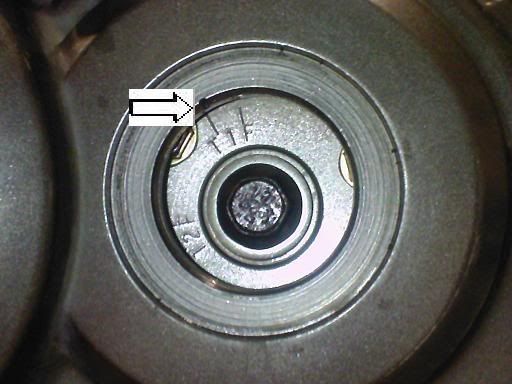
And
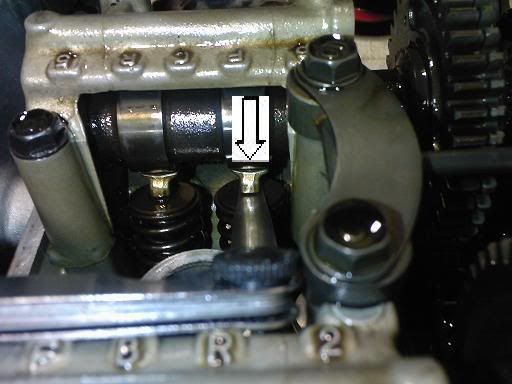
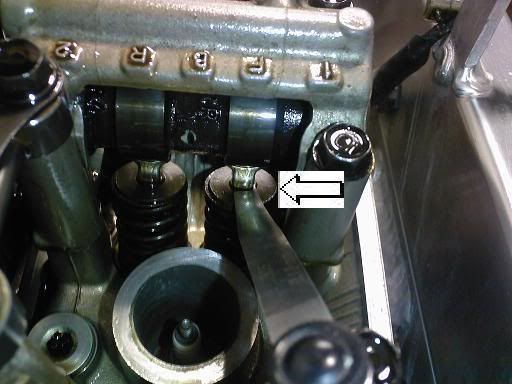
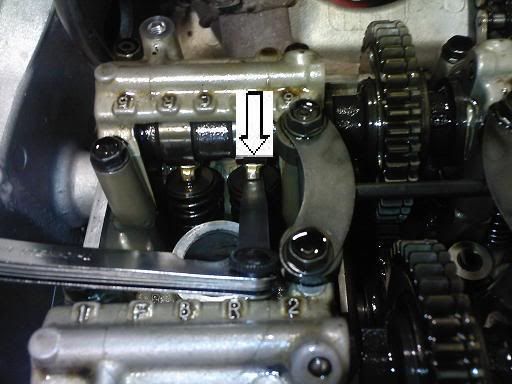
The hard work is behind you now. Next up is to check the gap between the shim and the camshaft (the long rod that has egg shaped things on it) When the lines are the same as the above pics you are then free to check the gap on cylinder no. 1 (rear left when sitting on the bike). There are 4 valves/shims per cylinder (and there are 4 cylinders making the bike, yes you guessed it, 16 valve ) that need checking now. The front 2 are known as inlet valves and the rear 2 are exhaust valves. The tolerance for all the inlet valves on the bike are 0.12mm-0.18mm so take out your feeler gauge and check it now. If it is within tolerance a gauge should fit in like so.
And the rear should be between 0.21mm-0.27mm and should fit like so,
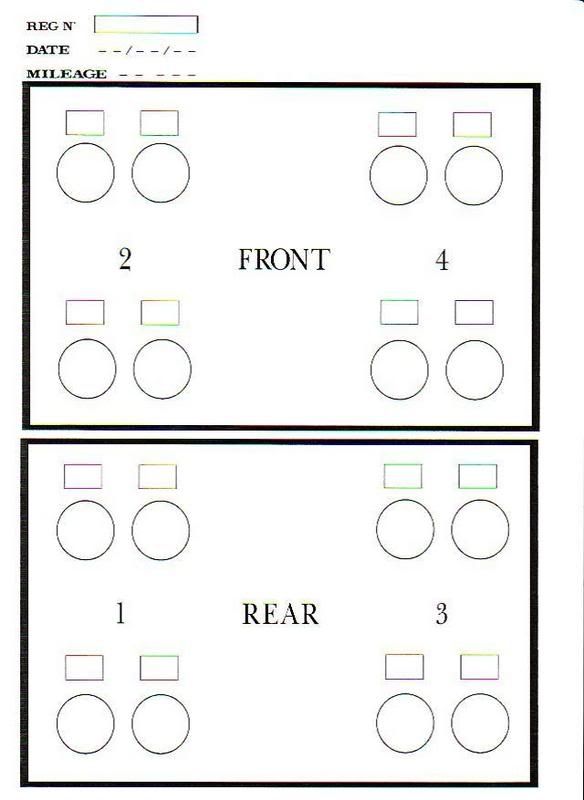
Once you know what the gap is please use the following page to write it down for future reference.
Once you have Cylinder no. 1's gap it's then time to do cyliner no. 3 (this is the one to the right of no. 1. Turn the Timing nut again until you get back to T1 again and the cam shaft will now line up in the opposite way to the way it did on cylinder no. 1.
Once you are at this stage you can then start to check the clearance on cylinder no. 3. Again the front 2 are the inlet valves and the rear are exhaust valves and the tolerances are still 0.12mm-0.18mm on the inlet valves and 0.21-mm-0.27mm on the exhaust valves. The following pics look the same as the ones above but believe me, thay are from cylinder no. 3. If you look really close you'll notice that.
Inlet valves
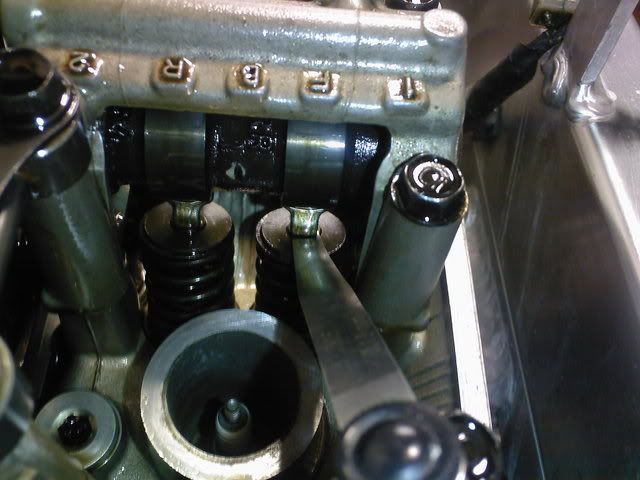
Exhaust valves
 |
Social worker: "Glen honey, I got a question for you. What do you do for a living?
Quagmire: "I got a question for you. Why are you still here?" |
Edited by - vfrman on 04/01/2007 04:50:12 |
|
|
viffer106
Senior Member

United Kingdom
2175 Posts |
Posted - 28/11/2006 : 10:53:22
|
| looks like youeve pretty much got it nailed so far mate..... |
New E-mail: chris.cannon396@gmail.com
90' VFR 400 NC30 "If it 'aint broke, dont fix it!" |
 |
|
|
viper_biker
Administrator
Ireland
7563 Posts |
Posted - 28/11/2006 : 11:25:58
|
quote:
Originally posted by viffer106
looks like youeve pretty much got it nailed so far mate.....
Thanks matey, send those pics across too that you have as I'm sure I can find a use for them. Do you have any pics on removing the shim as so far the rear head is fine (still to do the front). If not I'll show how to do this too. |
Social worker: "Glen honey, I got a question for you. What do you do for a living?
Quagmire: "I got a question for you. Why are you still here?" |
|
|
|
tarmac
Familiar Member

Australia
359 Posts |
Posted - 28/11/2006 : 11:35:07
|
I've not looked at a VFR head but usually you don't need to line up those marks. All you do is make sure the cam your measuring is pointing up.
You still need to take off the timing cover to turn the crank but no need to check that mark.
Could save you a bit of time. |
www.tw-performance.com.au |
|
|
|
VFR400_JON
Half of a double act
United Kingdom
2453 Posts |
Posted - 28/11/2006 : 11:44:36
|
| well its best to just check everything, just incase. |
1998 Kawasaki ZX7R |
|
|
|
viper_biker
Administrator
Ireland
7563 Posts |
Posted - 28/11/2006 : 11:54:13
|
| You may well be right tarmac but this is how it's 'supposed' to be done. I don't know otherwise but I do know this way works. If you want to check this out please feel free to do so and let us know cuz as you say, it may save time but I'm under the impression that if you don't line the marks up correctly why have them, and if the cam shaft is in the wrong place (ie pointing down) does this not mean that you'll not fit any feeler gauge in the gap? I may be wrong though. |
Social worker: "Glen honey, I got a question for you. What do you do for a living?
Quagmire: "I got a question for you. Why are you still here?" |
|
|
|
viffer106
Senior Member
United Kingdom
2175 Posts |
Posted - 28/11/2006 : 12:05:24
|
quote:
Originally posted by viper_biker
quote:
Originally posted by viffer106
looks like youeve pretty much got it nailed so far mate.....
Thanks matey, send those pics across too that you have as I'm sure I can find a use for them. Do you have any pics on removing the shim as so far the rear head is fine (still to do the front). If not I'll show how to do this too.
Ive got pics removing the shims, and putting them back in... I'll mail them over when i get in from work...Also some pics of the front - but its exactly the same as the rear, but with less access...
Oh, and some pics of a load of shims attached to a piece of paper with me trying to work out what shim to put where to get the clearances right!! |
New E-mail: chris.cannon396@gmail.com
90' VFR 400 NC30 "If it 'aint broke, dont fix it!" |
|
|
|
viper_biker
Administrator
Ireland
7563 Posts |
Posted - 28/11/2006 : 12:08:11
|
| Great Chris, that'll be a great help cuz I'm hoping I dont have to take any of my shims out. Not that it seems difficult, more of the fact that it means I have less work to do |
Social worker: "Glen honey, I got a question for you. What do you do for a living?
Quagmire: "I got a question for you. Why are you still here?" |
|
|
|
tarmac
Familiar Member
Australia
359 Posts |
Posted - 28/11/2006 : 12:09:02
|
The back of the cam is where you want to take the measurment from as its the place where the cam is furthest from the valve. The back of the cam has the same clearance for about 100 degrees so lineing that line up perfectly shouldn't be necessery.
If you look at the cam profile you notice that one side of the cam is basicly round (the other more pointed). This round portion is where the clearence is measured. At any other part the cam will be accelerating the valve either open or closed (ie touching the valve) so inserting a feeler guage would be impossible.
I've always done it this way on my 600. I see no reason for the vfr to be different.
But as said, maybe bes to check. I will when I have access to a bike. |
www.tw-performance.com.au |
|
|
|
viper_biker
Administrator
Ireland
7563 Posts |
Posted - 28/11/2006 : 12:21:14
|
| Sounds like a valid point to me tarmac, you may well be right and you obviously have more experience with this than me (this is only the 2nd time I've done this), although this is aimed more at people who are unfamiliar with this process (incl me) so the markings will serve a purpose for us |
Social worker: "Glen honey, I got a question for you. What do you do for a living?
Quagmire: "I got a question for you. Why are you still here?" |
|
|
|
tarmac
Familiar Member
Australia
359 Posts |
Posted - 28/11/2006 : 13:04:46
|
You have to do it by the book the first time. Then you understand what your doing.
Are the recomended clearance's the same for the rvf and vfr? |
www.tw-performance.com.au |
|
|
|
tarmac
Familiar Member
Australia
359 Posts |
Posted - 28/11/2006 : 13:08:34
|
| Something else I just thought of which may help is to separate the feeler guage blades and lay them on a surface face up (Size visable) in order , It makes it much easier to select the correct pair (eg 0.018 is two blades a 0.010 + 0.008) for the correct size and is less cumbersome with out having the handle in the engine as well as the blades. |
www.tw-performance.com.au |
|
|
|
Control-007
Regular Member

United Kingdom
930 Posts |
Posted - 28/11/2006 : 14:31:04
|
to make this thread better some info on how to do the cam timing if you've taken the cams out for whatever reason would be good as some peeps attempting this may drop the shims into the head by accident.....
but top thread guys |
|
|
|
JKW
New Member
United Kingdom
42 Posts |
Posted - 28/11/2006 : 17:30:16
|
| Hi all. Will this procedure be the same for the NC24 and if so will the clearances be the same? |
|
|
|
viper_biker
Administrator
Ireland
7563 Posts |
Posted - 28/11/2006 : 18:03:04
|
| JKW, checking the valve procedure should be the same but the tolerances might be different. Might be worth whils trying to find out what the gap tolerances are on the inlet and exhaust valves. |
Social worker: "Glen honey, I got a question for you. What do you do for a living?
Quagmire: "I got a question for you. Why are you still here?" |
|
|
|
viffer106
Senior Member
United Kingdom
2175 Posts |
Posted - 28/11/2006 : 19:09:34
|
Piccies uploaded mate... Use as you see fit!
Valve Clearances
The pics will be in that loaction probably forever now, so you can use their current location for images ect... |
New E-mail: chris.cannon396@gmail.com
90' VFR 400 NC30 "If it 'aint broke, dont fix it!" |
Edited by - viffer106 on 28/11/2006 20:15:49 |
|
|
|
Kermit
Regular Member
United Kingdom
838 Posts |
Posted - 28/11/2006 : 19:31:13
|
Nice write up vp and better pics than the Haynes manual. It deserves (once in final form) to be added to the workshop guides 
btw If you need some pics as as a warning for those that might be tempted to rush the job or not do it at all when the valves are due checking, feel free to use these pics 
Pic #1 Pic #2
tbh I'm not certain this engine damage was definatly caused by valves (could have been a lock-up) as it this knacker engine (& extra frame/swinger) came with my bike when i bought it |
|
|
|
giff
Senior Member
United Kingdom
1414 Posts |
Posted - 28/11/2006 : 20:46:59
|
quote:
Originally posted by viper_biker
- And possibly a flat headed screwdriver to carefully help you separate the cylinder head from the block.
Bloody hell!!! |
Giff |
|
|
|
crm250
Roll on may
United Kingdom
4821 Posts |
Posted - 28/11/2006 : 20:55:23
|
quote:
Originally posted by giff
quote:
Originally posted by viper_biker
- And possibly a flat headed screwdriver to carefully help you separate the cylinder head from the block.
Bloody hell!!!
Year bit heavy handed that gareth, the sharp edge may damage the seal. I sugest a gentle tap with a sledge hammer  |
CRM in "sold a bike" shocker |
|
|
|
Cillit-BANG
Senior Member
United Kingdom
1004 Posts |
Posted - 28/11/2006 : 21:01:02
|
Yeah, you might want to note that you haven't removed the head, but just the cam covers!! If you go out looking to buy new gaskets, the last thing you'll be wanting is a head gasket for just doing vavle clearances.
The 'Head' refers to the next portion down. |
NC30 roadbike- work in progress.
NC30 trackbike- work in progress. |
|
|
|
viper_biker
Administrator
Ireland
7563 Posts |
Posted - 29/11/2006 : 00:33:26
|
Sorry for the mistake, it's now amended. My excuse is it was late by the time I sat down to the PC last night and I was kinda drunk too 
Paul, what weight of hammer should do it? Does Honda have a name for this special tool?
As for the completion of this write-up it won't be finished until about Saturday afternoon as I'll not have the time due to family and work commitments. |
Social worker: "Glen honey, I got a question for you. What do you do for a living?
Quagmire: "I got a question for you. Why are you still here?" |
Edited by - viper_biker on 29/11/2006 00:40:07 |
|
|
|
Topic |
|
